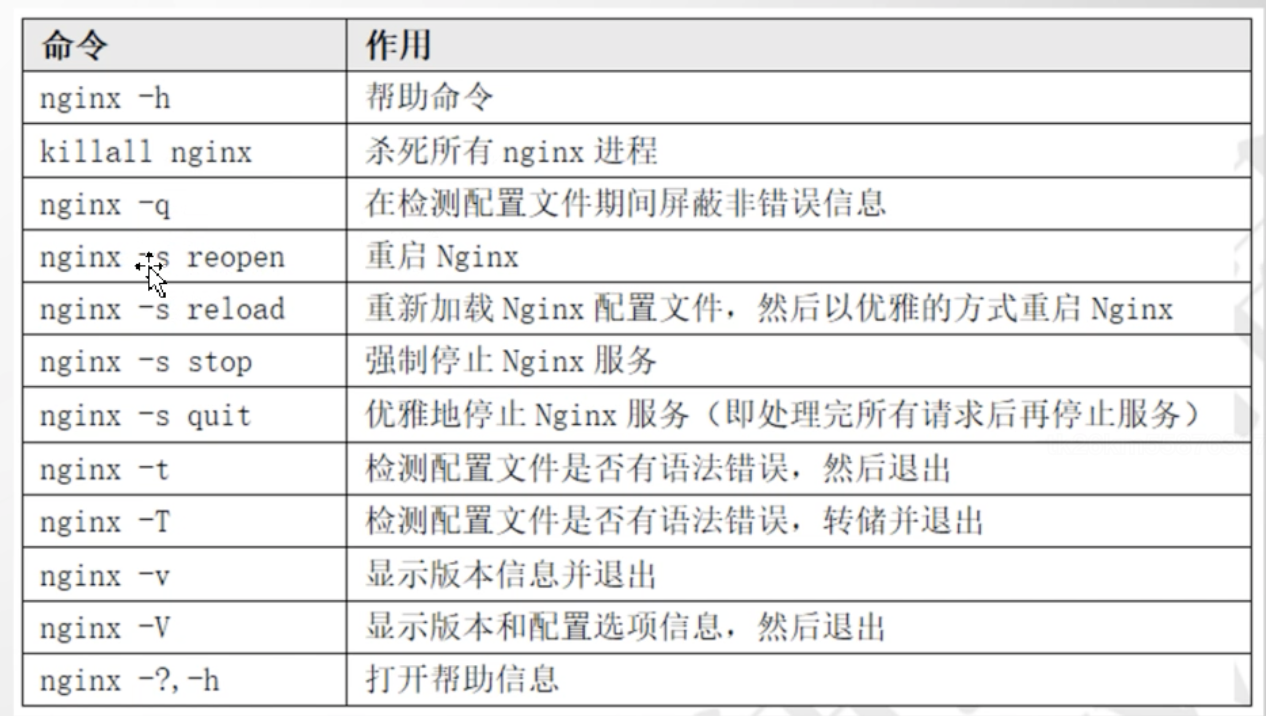
1.Nginx安装
安装nginx前首先要确认系统中是否安装了gcc 、pcre-devel、zlib-devel、openssl-devel
1
2
3
4
| #1、rpm包安装的,可以用 rpm -qa 看到,如果要查找某软件包是否安装,用 rpm -qa | grep "软件或者包的名字"
#2、以deb包安装的,可以用 dpkg -l 看到。如果是查找指定软件包,用 dpkg -l | grep "软件或者包的名字"
#3、yum方法安装的,可以用 yum list installed 查找,如果是查找指定包,用 yum list installed | grep "软件名或者包名"
yum list installed | grep "gcc"
|

安装依赖包
1
| yum -y install gcc pcre-devel zlib-devel openssl openssl-devel
|
下载并解压安装包
1
2
3
4
5
6
7
| //创建nginx存放文件夹
cd /usr/local
#下载tar包
wget http://nginx.org/download/nginx-1.23.2.tar.gz
tar -xvf nginx-1.23.2.tar.gz
mv nginx-1.23.2 nginx
#
|
配置
1
2
3
4
5
6
| cd nginx
mkdir logs
./configure --prefix=/usr/local/nginx
make
make install
|
测试是否安装成功
1
2
| cd /usr/local/nginx
./sbin/nginx -t
|
配置nginx.conf
1
2
3
4
5
6
7
8
9
10
11
12
13
14
15
16
17
18
19
20
21
22
23
24
25
26
27
28
29
30
31
| vim /usr/local/nginx/cong/nginx.conf
server {
listen 80;
server_name localhost;
location / {
root /usr/local/webapp/dist;
index /index.html;
}
location /log {
alias html/log;
index index.html index.htm;
autoindex on;
}
location /ruoyi {
root /usr/local/nginx/html/dist;
try_files $uri $uri/ /index.html;
index index.html index.htm;
}
location /adminApi {
proxy_pass http://ip:port;
}
}
|
启动
1
2
3
| #启动nginx
cd /usr/local/nginx/sbin
./nginx
|
常见问题
- nginx启动提示:nginx: [emerg] bind() to 0.0.0.0:8080 failed (98: Address already in use)
- 修改端口
1
2
3
4
5
6
7
8
9
10
11
12
13
14
15
| #首先进入nginx/conf目录(根据自己的目录来写)
# vi /usr/nginx/conf/nginx.conf
#修改nginx.conf,将8080端口修改为其他端口号
server {
listen 8080;
server_name localhost;
#更换端口之后,然后重启nginx就可以了
server {
listen 8888;
server_name localhost;
...
}
|
- 取消占用端口号进程
1
2
3
4
5
6
| #查看被占用的端口
netstat -nlp|grep :8080
tcp 0 0 0.0.0.0:8888 0.0.0.0:* LISTEN 24594/nginx: master
#结束进程24594
kill -9 24594
#然后再重启nginx就可以了
|
常用命令
1
2
3
4
5
6
7
8
9
10
11
12
13
14
15
16
17
18
19
20
21
22
23
24
25
26
27
28
29
30
31
32
33
34
35
36
37
38
39
40
| #修改配置后重新启动
./nginx -s reload
#如果出现:nginx: [error] open() "/usr/local/nginx/logs/nginx.pid" failed
/usr/local/nginx/sbin/nginx -c /usr/local/nginx/conf/nginx.conf
#再次启动即可
#查看nginx进程是否启动
ps -ef|grep nginx
#平滑启动nginx
kill -HUP
#主进程号或进程号文件路径 或者使用
/usr/nginx/sbin/nginx -s reload
#注意,修改了配置文件后最好先检查一下修改过的配置文件是否正 确,以免重启后Nginx出现错误影响服务器稳定运行。
#判断Nginx配置是否正确命令如下:
nginx -t -c /usr/nginx/conf/nginx.conf
#或者使用
/usr/nginx/sbin/nginx -t
#重启
nginx reload
/usr/local/nginx/sbin/nginx -s reload
service nginx restart
#检查 nginx.conf 配置文件是否有错
/usr/local/nginx/sbin/nginx -t
#nginx启动命令:
/usr/local/nginx/sbin/nginx
#指定配置文件启动
/usr/local/nginx/sbin/nginx -c /usr/local/nginx/conf/nginx.conf
#关闭命令:
/usr/local/nginx/sbin/nginx -s stop
#重启命令:
/usr/local/nginx/sbin/nginx -s reload
#启动
./nginx
#关闭
./nginx -s stop
|

启动后访问localhost 效果如下:

2.Nginx配置
1
2
3
4
5
6
7
8
9
10
11
12
13
14
15
16
17
18
19
20
21
22
23
24
25
| ...... 全局块
events {
true//events 块
}
#
stream {
server {
listen 3306;
proxy_pass db;
}
upstream db {
server 192.168.18.130:3305;
server 192.168.18.129:3305;
}
}
http{
##http全局块
true server+{
truetruelocation +[]
true}
}
|
2.1配置内容规则
官网配置教程:https://nginx.org/en/docs/dirindex.html
变量应用:https://nginx.org/en/docs/varindex.html
- 用#表示注释
- 每行配置的结尾需要加上分号
- 如果配置项值中包括语法符号,比如空格符,那么需要使用单引号或者双引号行括住配置项值,否则ngin x会报语法错误
- 单位简写:
- K或者k千字节(kilo byte, KB)
- M或者m兆字节(megabyte MB)
- ms(毫秒),s(秒), m(分), h(小时) , d (天), w(周), M(月,包含30天),y(年)
2.2 详细配置内容
1
2
3
4
5
6
7
8
9
10
11
12
13
14
15
16
17
18
19
20
21
22
23
24
25
26
27
28
29
30
31
32
33
34
35
36
37
38
39
40
41
42
43
44
45
46
47
48
49
50
51
52
53
54
55
56
57
58
59
60
61
62
63
64
65
66
67
68
69
70
71
72
73
74
75
76
77
78
79
80
81
82
83
84
85
86
87
88
89
90
91
92
93
94
95
96
97
98
99
100
101
102
103
104
105
106
107
108
109
110
111
112
113
114
115
116
117
118
119
120
121
122
123
124
125
126
127
128
129
130
131
132
133
134
135
136
137
138
139
140
141
142
143
144
145
146
147
148
149
150
151
152
153
154
155
156
157
| ######## Nginx的main(全局配置)文件
#指定nginx运行的用户及用户组,默认为nobody
#user nobody;
#开启的线程数,一般跟逻辑CPU核数一致
worker_processes 1;
#定位全局错误日志文件,级别以notice显示,还有debug,info,warn,error,crit模式,debug输出最多,crir输出最少,根据实际环境而定
#error_log logs/error.log;
#error_log logs/error.log notice;
#error_log logs/error.log info;
#指定进程id的存储文件位置
#pid logs/nginx.pid;
#指定一个nginx进程打开的最多文件描述符数目,受系统进程的最大打开文件数量限制
#worker_rlimit_nofile 65535
events {
#设置工作模式为epoll,除此之外还有select,poll,kqueue,rtsig和/dev/poll模式
#use epoll;
#定义每个进程的最大连接数,受系统进程的最大打开文件数量限制。
worker_connections 1024;
}
###数据库的负载均衡
stream {
upstream mysql_nginx {
hash $remote_addr consistent;
server 192.168.18.128:3306 weight=5 max_fails=3 fail_timeout=30s;
server 192.168.18.129:3306;
server 192.168.18.130:3306;
##last_conn; #最小连接
}
server {
listen 3306; # 数据库服务器监听端口
proxy_connect_timeout 10s;
proxy_timeout 300s; # 设置客户端和代理服务之间的超时时间,如果5分钟内没操作将自动断开。
proxy_pass mysql_nginx;
}
}
#######Nginx的Http服务器配置,Gzip配置
http {
#主模块指令,实现对配置文件所包含的文件的设定,可以减少主配置文件的复杂度,DNS主配置文件中的zonerfc1912,acl基本上都是用include语句。
include mime.types;
#核心模块指令,智力默认设置为二进制流,也就是当文件类型未定义时使用这种方式
default_type application/octet-stream;
#下面代码为日志格式的设定,main为日志格式的名称,可自行设置,后面引用
#log_format main '$remote_addr - $remote_user [$time_local] "$request" '
# '$status $body_bytes_sent "$http_referer" '
# '"$http_user_agent" "$http_x_forwarded_for"';
#引用日志main, main是log-format的格式,在上面配置了;后面可以加上日志缓冲区大小,写满了就flush到磁盘中buffer = 1M;
#access_log logs/access.log main;
#设置允许客户端请求的最大的单个文件字节数
#client_max_body_size 20M;
#指定来自客户端请求头的headebuffer大小
#client_header_buffer_size 32k;
#指定连接请求试图写入缓存文件的目录路径
#client_body_temp_path /dev/shm/client_body_temp;
#指定客户端请求中较大的消息头的缓存最大数量和大小,目前设置为4个32KB
#large client_header_buffers 4 32k;
#开启高效文件传输模式
sendfile on;
#开启防止网络阻塞
#tcp_nopush on;
#开启防止网络阻塞
#tcp_nodelay on;
#设置客户端连接保存活动的超时时间
#keepalive_timeout 0;
keepalive_timeout 65;
#设置客户端请求读取超时时间
#client_header_timeout 10;
#设置客户端请求主体读取超时时间
#client_body_timeout 10;
#用于设置相应客户端的超时时间
#send_timeout
####HttpGZip模块配置
#httpGzip modules
#开启gzip压缩
#gzip on;
#设置允许压缩的页面最小字节数
#gzip_min_length 1k;
#申请4个单位为16K的内存作为压缩结果流缓存
#gzip_buffers 4 16k;
#设置识别http协议的版本,默认为1.1
#gzip_http_version 1.1;
#指定gzip压缩比,1-9数字越小,压缩比越小,速度越快
#gzip_comp_level 2;
#指定压缩的类型
#gzip_types text/plain application/x-javascript text/css application/xml;
#让前端的缓存服务器进过gzip压缩的页面
#gzip_vary on;
#########Nginx的server虚拟主机配置
server {
#监听端口为 80
listen 80;
#设置主机域名
server_name localhost;
#设置访问的语言编码
#charset koi8-r;
#设置虚拟主机访问日志的存放路径及日志的格式为main
#access_log logs/host.access.log main;
#设置虚拟主机的基本信息
location / {
#设置虚拟主机的网站根目录
root html;
#设置虚拟主机默认访问的网页
index index.html index.htm;
}
#error_page 404 /404.html;
# redirect server error pages to the static page /50x.html
#
error_page 500 502 503 504 /50x.html;
location = /50x.html {
root html;
}
# proxy the PHP scripts to Apache listening on 127.0.0.1:80
#
#location ~ \.php$ {
# proxy_pass http://127.0.0.1;
#}
# pass the PHP scripts to FastCGI server listening on 127.0.0.1:9000
#
#location ~ \.php$ {
# root html;
# fastcgi_pass 127.0.0.1:9000;
# fastcgi_index index.php;
# fastcgi_param SCRIPT_FILENAME /scripts$fastcgi_script_name;
# include fastcgi_params;
#}
# deny access to .htaccess files, if Apache's document root
# concurs with nginx's one
#
#location ~ /\.ht {
# deny all;
#}
}
}
|
2.3 日志
在nginx同级目录下logs文件夹
- access.log 正常日志
- error.log 错误日期
需要在nginx.conf中的http模块配置access_log


